Set up GitLab CI with an iOS project that uses Cocoapods

We all write tests for our applications and keep them in version controlled systems like GitLab or GitHub. However, how can we configure GitLab to run Unit and UI tests for us?
I couldn’t find a lot of documentation explaining how to set up continuous integration for iOS on GitLab, therefore I am writing this article.
Victor Peschenkov explains in his article how to use GitLab CI with Fastlane. My article focuses on how to run everything yourself.
Requirements
In order to set up GitLab Runner for iOS we need the following tools:
- Mac
- Xcode 10
- GitLab.com account (or a self-hosted one)
- Homebrew
- CocoaPods (use Homebrew:
brew install cocoapods)
Please install these tools now before continuing.
Configure Xcode
Make sure to download Xcode form the Mac App Store. Once it is installed open it and create a project to make sure it is completely installed and running.
iOS Project
I created a sample project to get you started more quickly. Feel free to fork it or use your own project. Please verify your installation using:
git checkout git@gitlab.com:skofgar/ios-ci-sample.git- switch into the project folder and run
pod install - run the following command on your machine to verify that you can build and run the tests successfully — which means no “failures” or other error messages
xcodebuild test \
-workspace "CI Sample.xcworkspace" \
-scheme "CI Sample" -destination 'platform=iOS Simulator,name=iPhone XR,OS=12.0' \
| xcpretty -s
Installing GitLab Runner
iOS projects require a special GitLab Runner. Usually gitlab-runner can be hosted on any machine (virtual machine, Linux-, Mac- or Windows-system). However, iOS related projects need a GitLab Runner, that is hosted on a Mac with Xcode in order to build successfully.
Install GitLab Runner on a Mac
Follow these steps to configure GitLab Runner on your Mac:
- use the command
brew install gitlab-runner - go to your GitLab instance to
Settings>CI/CD - disable
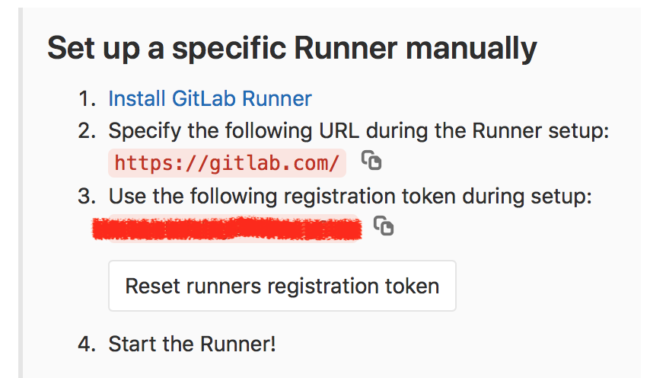
shared runners(alternatively you can use tags to only use your Mac for building the iOS project) - go to
Specific Runnersand save your GitLab serverurlandtoken

(token has been removed on purpose)
- register a your runner as described in GitLabs documentation
gitlab-runner register1. when prompted, enter theurlfrom above
2. next up, enter theregistration token
3. name your runner
4. leave the tags blank
5. use theshellexecutor- start your runner
cd ~
gitlab-runner install
gitlab-runner start
Please note, should you restart your computer you’ll likely have to start the GitLab Runner again.
Reload the CI/CD settings page. If everything worked out, you should be able to see your runner in the Specific Runners section:

Create gitlab-ci.yaml
Once we have a GitLab runner for iOS and a project, we need to configure it. Please add a gitlab-ci.yaml and insert:
stages:
  - build

variables:
  LC_ALL: "en_US.UTF-8" # apparently xcpretty won't function correctly otherwise

before_script:
  - gem install cocoapods
  - pod install

build_project:
  stage: build
  script:
    - xcodebuild clean -workspace "CI Sample.xcworkspace" -scheme "CI Sample" | xcpretty
    - xcodebuild test -workspace "CI Sample.xcworkspace" -scheme "CI Sample" -destination 'platform=iOS Simulator,name=iPhone XR,OS=12.0' | xcpretty -s
As soon as you commit this file, GitLab-CI should kick in and start building your project and then run the tests.
That’s it you’ve done it!
Feedback
What do you think? Please let me know if you run into any problems or have improvement suggestions.
Resources
- https://about.gitlab.com/2016/03/10/setting-up-gitlab-ci-for-ios-projects/
- https://medium.com/flawless-app-stories/how-to-set-up-gitlab-continuous-integration-for-ios-projects-without-a-hustle-53c2b642c90f
- https://github.com/supermarin/xcpretty/issues/73
Originally published at Skofgar’s Blog.
Comments
Post a Comment